November 2022: CHARTS Patch 139: Year End Update
Table of Contents
Please Print This Page.
- Prior to year-end, you should load the November 15th, 2022 Year End Release: Update #139
- Payroll: Before closing out the year:
- Adjusting for Non-Payroll Compensation. See P-4470.
- Health Insurance Premium Reporting
- Payroll: After the last payroll of the year
- Payroll: Carrying over Sick/Vacation/Holiday/Personal Benefits to the New Year
- Payroll: Federal Tax Tables are not yet available
- FICA Rates remain unchanged, the FICA limit has been increased to $160,200 for 2023
- 401K Deductions have been increased for 2023
- Payroll: Printing W2s
- Verify W2 information
- Obtaining a UserID to submit W2s
- Printing your 2022 W2s
- Verifying and filing your W2s with the federal government
II. Payroll: Before closing out the year.
Adjusting for Non-Payroll Compensation. See P-4470
If an employer pays for an automobile that the employee uses for business or if the employer pays for certain life insurance policies for the employee, the employee is obligated to pay tax on a portion of the value of these benefits. To handle this see P-4470.
Health Insurance Premium Reporting – 2022 W2 Reporting.
Employers required to file 250 or more W-2 forms are responsible for reporting to employees the total cost of their group health benefit plan coverage on their W-2 forms under the Patient Protection and Affordable Care Act. This requirement went into effect in 2012 with the 2012 W-2 forms. Reportable costs include both employer and employee contributions for group health plan coverage. This requirement is informational only and any employer-provided coverage will not be subject to income tax.
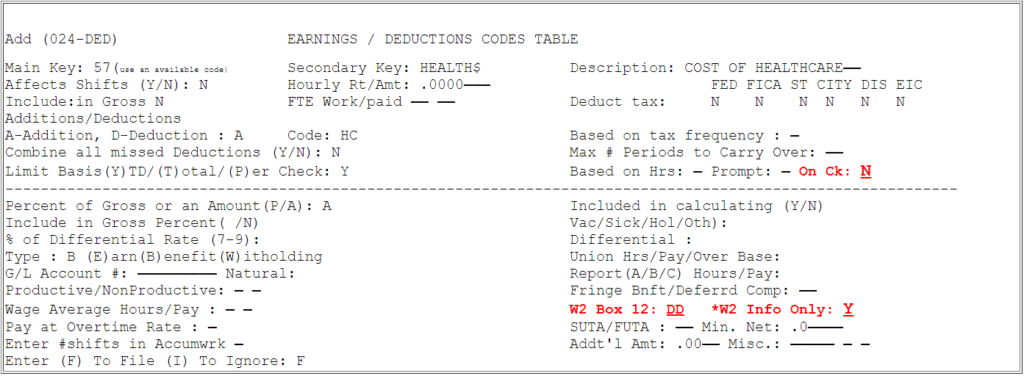
Please verify your deduction code in Change Table File – CTF, 10, 3 – Deduction Code Table. Make sure that the W2 Box 12 is set to “DD” and that the W2 Info Only field is set to “Y”. Also verify that the Print Deduction On Check field ‘On Chk’ should be set to “N”, this will suppress the Health Insurance amount from printing on the employee stub of the payroll check. [Please note in the example below code ’57’ is used for illustration purposes only, use an available code.]
Yearly premium amounts can then be entered in the ACCUMWRK screen [PR, 2, 2]. Any amounts entered will be reflected on the W2 form. Amounts entered will not change yearly employee compensation amounts or impact tax liability.
III: Payroll: After your last payroll of the year.
The “Year End Procedure” is no longer required. Facilities can start 2023 payrolls without RHS client services intervention.
When printing payroll checks for the first time in 2023 [PRINTCKS – PR, 3] the 2022 payroll backup facility will be automatically created and all 2023 year to date totals will be reset to zero. It is important that when setting the first payroll period in 2023 [SETPR – PR, 1, 1] that the Beginning/End Indicator be set to ‘B’ for both Month and Year.
Both 2022 and 2023 payroll data can be accessed from the current nursing facility. It will therefore be possible to run payroll reports crossing years if desired.
You will still be able to log into the 2022 Employee Master information to quickly review year end totals or make payroll adjustments after the 2023 payroll is live.
IV: Payroll: Carrying over Sick/Vacation/Holiday/Personal Benefits to the new year.
BEFORE STARTING – MAKE SURE THAT YOU ARE LOGGED INTO THE CURRENT ACTIVE PAYROLL
Step 1. Verify the User Parameter PR Screen – Type NHPR (CR)
Make sure that the Carryover Percentage for Sick and Vacation is 100% – if you are carrying over Sick and Vacation fully.
| Sick | Vacation | |||
| % Payout/Carryover line | xxxxx | 100.00 | xxxxxx | 100.00 |
Press ENTER to Save.
Step 2. Running the Accrual Update Program
Run Update Vac/Sick/Hol Info [GM,18, 4, 1, 7]
Fill in the screen as follows:
Processing Order: E
From Department: A To ZZ
From Date: MM/DD/YY To MM/DD/YY [generally 01/01/2022 – 12/31/2022]
Vacation: _ (enter Y if you are carrying over vacation)
Sick : _ (enter Y if you are carrying over sick)
Holiday:_ (enter Y if you are carrying over holiday)
Enter an ‘X’ to Run Update: X (This Must Be Entered.)
Print Terminated Employees: N
Print Option: – Spool or Printer default
The remaining questions on the screen can be left as prompted.
Press ENTER.
Step 3. Run an Accrued Benefits Report to verify that the information is correct.
Reminder: If printing accruals on payroll checks, make sure to change the accrual start date to January 1, 2023 in NHPR [UP, 5] or leave that date blank and the system will automatically assume January 1 of the current year.
V: Payroll: FICA rates remain unchanged, the FICA limits have been increased to $160,200 for 2023.
The FICA limit for 2023 has been increased from $147,000 to $160,200. The FICA rates are unchanged from 2022.
401K Deduction Limits
The 401K deduction limits have been increased for 2023.$22,500 for those under 50 years of age
$22,500 plus an additional $7,500 catch up contribution for those over 50 years of age (total limit $30,000).
VI: Payroll: Printing W2s
Verify W2 Information
Check Earning/Deduction Table File (CTF 10, 3) to ensure that all items have the correct tax status:
In the Earning/Deduction table file a “Y” = indicates that the particular tax applies.
A rule-of-thumb as to which Earning/Deduction impacts taxes is as follows:Earnings – All Taxes (all “Y”s)Deductions – No Taxes (all “N”s)Qualified Plan – All Taxes (“Y”s) except FICA (“N”)
Check Earning/Deduction Table File to Ensure that Code 61 exists for 3rd Party Pay.
Check with your accountant if any fringe benefits or deferred compensation amounts are applicable to your facility. If they are – then make sure that an entry for this item exists in the Earning/Deduction Table File so that the W2’s are correct. These amounts should be entered in the 2022 payroll prior to printing the W2’s and Quarterly reports.
If your Facility has any of the following pension plans then you must check the Earning/Deduction Payroll Table Files to ensure that:1) A “Y” has been entered for Deferred Compensation
2) The correct code was entered in the field Box 12 for W2.Code
Pension Plan
04 401 (k) 05 403(b) 06 408(k) 07 section 457 plan 08 501 (c) (1 8) (D) 12 other non qualified plan
3) SUTA/FUTA N N
4) Tax Status Y N Y Y Y Y [ Illustration is for states that allow Pensions Plans to be deducted from state and local income, for example NY State.]
Tax Status Y N N N N N [ Illustration is for states that do not allow Pension Plans to be deducted from state and local income, example PA.]
Important Note: Changing the tax codes may affect the taxable wages which might require sending a revised quarterly report to the IRS (Form 941-X) and/or State.
Obtaining a UserID to submit W2s
The procedure for obtaining a User Id was probably done by your facility in a previous year when creating magnetic media W2 Copy A for the IRS. If you did this in a previous year skip to Printing your 2022 W2’s. Otherwise follow the instructions outlined below.
Step 1. Obtain a User ID: a) online, or b) by telephone:
a) On-line: go to http://www.ssa.gov/bso/bsowelcome.htm . Click on Register, click on I Accept, complete the information as requested.
b) Telephone: Call 1 (800) 772-6270.
Step 2. Create Table File Entry:
After you receive your PIN number do the following:
From any CHARTS menu type ATF ENTER, 18 ENTER, 10 ENTER.
At Main Key type W2 , at Secondary Key type W2FILE , and press ENTER.
The following screen appears:
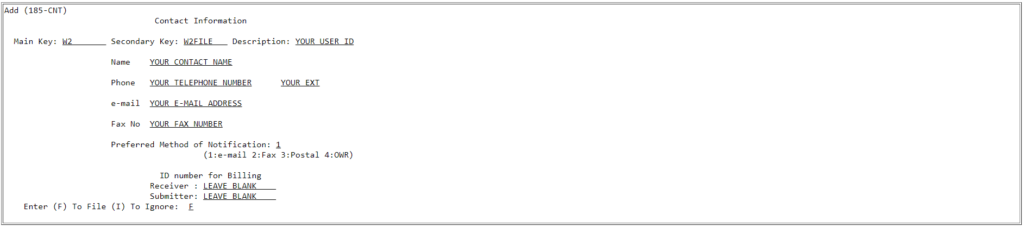
Note: The telephone number must be entered without dashes.
Fill in the information as noted above and press ENTER.
Printing your 2022 W2s
Printing the W2’s:
You will need to run the W2 program twice:
1. Copy A For Social Security Administrator on paper or magnetic media.
2. The employee copies.
Copy A For Social Security Administrator – On Paper:
Do this section only if you have less than 250 employees and you are printing the W2’s. If you are doing Copy A on magnetic media skip to Copy A For Social Security Administrator – On Magnetic Media
Type SETPRINT and select the proper print class. [CTF, 19, 1- Laser Printers ‘Printer Classes’ in Column #2]
From any CHARTS menu type W2NEW or [GM, 10, 6, 4] and press Enter.

Complete the above screen, insert Copy A forms in your printer and press ENTER. Go to print The Employee copies.
Copy A For Social Security Administrator – On Magnetic Media
From any CHARTS menu type W2NEW or [GM, 10, 6, 4] and press Enter.
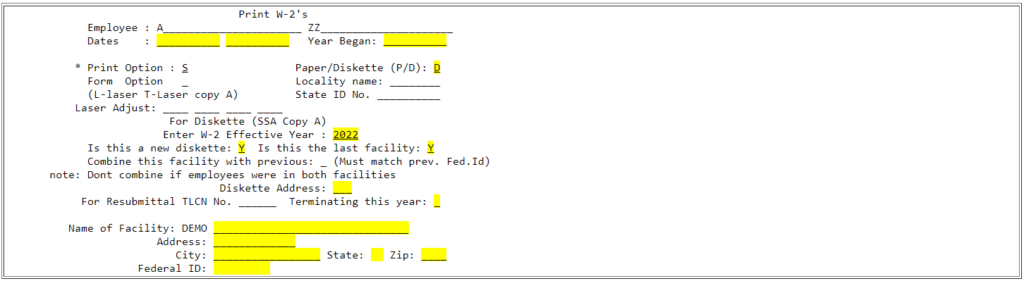
Complete the above screen, insert the 4 part W2 into your printer & press ENTER.
The Employee copies:
Type SETPRINT and select the proper print class. [CTF, 19, 1- Laser Printers ‘Printer Classes’ in Column #1]
From any CHARTS menu type W2NEW or [GM, 10, 6, 4] and press Enter.

Different laser printers are aligned slightly differently.
Print only a few W2s to check your printer’s alignment.
If the W2s print ok, go ahead and print your W2s.
If not, at Laser Adjust type a positive number (start with 10) to adjust downwards or a negative number (start with -10) to adjust upwards.
Verifying and filing your W2s with the federal government
You will need to obtain a User Id as previously described before submitting your W2’s.
Note: That the process of veryifying and submitting W2s has changed from previous years.
Please follow the following steps:
1) Verify your W2s prior to submission
Go to their web site https://www.ssa.gov/bso/bsowelcome.htm
Click “Log In” then and enter your User ID and Password and Press Enter.
Click “Report Wages to Social Security“
Click “I Accept“
Click the “AccuWage Online” tab and then Click on “Accuwage Online“
Select “W-2 (Regulars)” and Click on “Start Testing” to begin the testing process.
2) Submitting your W2s
After your W2s have been verified (step 1 above.) you are ready to submit your W2s.
Go to their web site https://www.ssa.gov/bso/bsowelcome.htm
Click “Log In” then and enter your User ID and Password and Press Enter.
Click “Report Wages to Social Security“
Click “I Accept“
Click “Upload Formatted Wage File” and then Click on “Submit/Resubmit a Formatted Wage File“
Click “Continue“
Locate the W2 file created in Charts and Press “Submit“.
Online Documentation
Documentation is also available at http://www.ssa.gov/employer/bsotut.htm by selection “W-2 Online (Word Document)“.